
There are tons of third-party partition managers
for Windows, but did you know that Windows includes its own partition manager?
Microsoft did a good job of hiding the built-in partition manager, but it’s
there.
You can use the Disk Management tool
to re-size, create, delete and format partitions and change their drive letters,
all without downloading or paying for any other software.
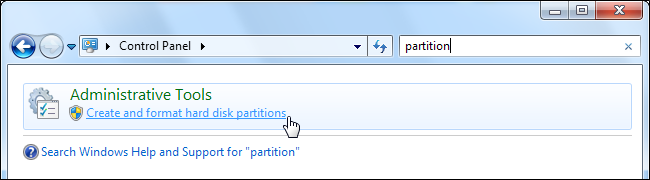
1. Accessing Disk Management
1.1
The quickest way to launch
the Disk Management tool is by typing “Partition”
into the search box in the Control Panel or Start
menu. Just click the “Create and Format Hard Disk Partitions”
option that comes up.
1.2
You’ll see a window
divided into two panes. The top pane shows you a list of your partitions,
referred to as volumes, and the bottom one shows you a graphical representation
of your storage devices.

2. Re-sizing a Partition
2.1
Right-click a partition
in either pane and select Extend Volume or Shrink Volume
to re-size it. Other options for manipulating partitions are also located in the
right-click menu.

2.2
Extending and shrinking
have some basic limitations. You can only shrink a partition if it has enough
free space, and you can only extend a partition if it has unallocated space to
the right of it on the same drive. You’ll see empty, unallocated space to the
right of a partition if you can extend it. Windows can’t extend a basic
partition to its left; you’ll need third-party software for that.

3.
Creating a Partition
3.1
Once you’ve shrunk a
partition, you can use the free space to create another one. Just right-click
inside the unallocated space and select New Simple Volume

3.2
You’ll see the New
Simple Volume wizard, which guides you through setting a size for the
partition, assigning a drive letter and formatting it with a file system.

4. Deleting a Partition
You can also right-click a partition and select Delete
Volume to delete a partition and free up space. This option deletes
every single file on the partition; be careful when using it!

5. Changing Drive Letters
5.1 Right-click a partition and select Change
Drive Letter and Paths to change its drive letter. Click the Change
button to select a new drive letter.

5.2 You can use this dialog to assign a
permanent drive letter to a removable drive or remove a
partition’s drive letter and hide it.
6. Formatting a Partition
6.1 Use the Format option in a
partition’s right-click menu to format it with a new file system and erase its
contents. You’ll lose all files on the partition if you do this!

6.2 You can also format partitions by right-clicking
them in Windows Explorer and selecting the Format option.

The Disk Management tool isn’t as flashy as many third-party partition
managers
This article/tutorial is written by Er. Bharat Dankoti, DDC Gorkha. For feedback, please comment on the article below.
0 comments:
Post a Comment